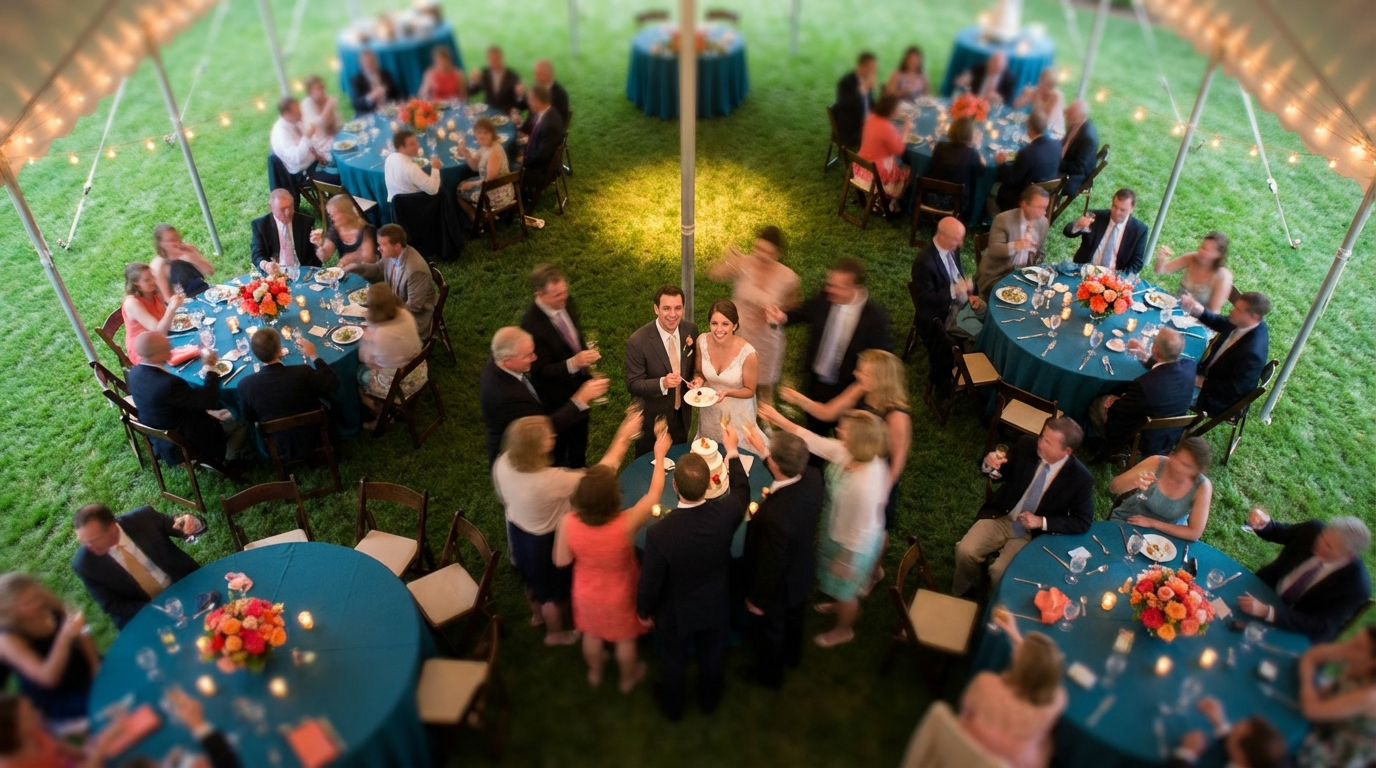
Planning an event under a spacious 40x100 tent? It’s an exciting prospect, offering a blank canvas for weddings, corporate events, and large celebrations. But maximizing that space requires careful planning. A poorly designed 40x100 tent layout can lead to guest discomfort, logistical nightmares, and an overall underwhelming experience. Don't let your event fall flat! This guide will walk you through common layout pitfalls and how to avoid them, ensuring your event is a resounding success. Let's dive into how to create a functional and fabulous tent layout.
Key Takeaways
- Prioritize guest comfort by ensuring adequate spacing between tables and walkways within your 40x100 tent layout.
- Consider the flow of traffic and strategically position key areas like the dance floor, buffet, and bar to prevent bottlenecks.
- Leverage online seating chart tools like SeatingChartCreator.com to visualize and optimize your tent layout before the big day.
- Don't underestimate the impact of lighting and décor; these elements can significantly enhance the ambiance of your tented event.
- Always factor in practical considerations like power access, restrooms, and emergency exits when planning your 40x100 tent layout.
Why a Well-Planned 40x100 Tent Layout is Crucial
A 40x100 tent offers a substantial 4,000 square feet of event space. But size alone doesn't guarantee success. Without a well-thought-out seating plan, you risk creating a chaotic and uncomfortable environment. Imagine guests bumping into each other, long lines at the buffet, and a dance floor that feels cramped. These are all symptoms of a poorly planned layout.
Design Your Perfect Seating Chart
Free drag-and-drop seating chart creator for weddings, events, and venues. Export professional PDFs in minutes.
Create Free Seating ChartThink of your tent as a miniature venue. Just like any venue, it needs to be designed to accommodate the number of guests, the type of event, and the various activities planned. A good layout optimizes flow, promotes interaction, and ensures everyone has a positive experience. It's about more than just fitting tables and chairs; it's about creating an atmosphere that enhances your event.
Consider the specific needs of your event. Is it a formal wedding with plated dinners? Or a casual corporate picnic with buffet stations? The layout should reflect the event's style and purpose. This ensures that the space is not only functional but also contributes to the overall ambiance and enjoyment of your guests.
Common 40x100 Tent Layout Disasters
Even with the best intentions, it's easy to make mistakes when planning a 40x100 tent layout. Here are some common pitfalls to watch out for:
- Insufficient Spacing: Cramming too many tables into the tent leaves guests feeling cramped and makes it difficult to move around.
- Poor Traffic Flow: Blocking pathways with tables or creating bottlenecks around key areas like the bar or buffet leads to frustration.
- Ignoring Focal Points: Failing to highlight the stage, head table, or dance floor can make the event feel disjointed.
- Inadequate Lighting: Poor lighting can create a drab and uninviting atmosphere.
- Neglecting Practical Needs: Forgetting about power access, restroom locations, or emergency exits can create major problems.
These mistakes can be avoided with careful planning and attention to detail. A seating chart creator can be invaluable in visualizing your layout and identifying potential problems before they arise. By addressing these issues proactively, you can ensure a smooth and enjoyable event for everyone.
Calculating Table Capacity for Your 40x100 Tent
Determining the number of tables your 40x100 tent can comfortably accommodate is a crucial first step. This involves considering the table size, shape, and the amount of space needed for walkways and other essential elements.
As a general rule, allow for at least 3 feet of space between tables to ensure guests can move freely. This spacing should be even greater (4-5 feet) around high-traffic areas like the buffet or bar. Let's look at some common table sizes:
- 60-inch Round Tables: Comfortably seat 8-10 guests.
- 72-inch Round Tables: Comfortably seat 10-12 guests.
- 6-foot Rectangular Tables: Comfortably seat 6-8 guests.
- 8-foot Rectangular Tables: Comfortably seat 8-10 guests.
To maximize space, consider mixing table shapes. Rectangular tables can be arranged in long rows, conserving space compared to round tables. Once you've determined your table choices, you can use a table arrangement tool to experiment with different configurations and find the optimal layout for your tent.
Step-by-Step Guide: Creating Your 40x100 Tent Layout
Creating an effective 40x100 tent layout doesn’t have to be overwhelming. Follow these steps to ensure a smooth and successful planning process:
Gather Your Information
Start by collecting all the necessary information, including the final guest count, the dimensions of the tent, and the location of any fixed features like power outlets or restrooms. Obtain a detailed floor plan of the tent space, if available.
Determine Key Areas
Identify the essential areas within the tent, such as the dining area, dance floor, stage, bar, buffet, and any lounge areas. Consider the size and location of each area based on your event's specific needs and activities.
Choose Your Table Configuration
Decide on the type and size of tables you'll use (round, rectangular, etc.) and determine how many guests will be seated at each table. Consider the overall aesthetic you want to achieve. Round tables encourage conversation, while rectangular tables offer a more modern look.
Create a Preliminary Layout
Using a seating chart creator like SeatingChartCreator.com, start experimenting with different table arrangements within the tent. Pay close attention to spacing between tables and walkways to ensure adequate flow. Place key areas strategically, considering factors like visibility and accessibility.
Refine and Optimize
Once you have a preliminary layout, review it carefully and make any necessary adjustments. Consider the sightlines from different tables to the stage or focal point. Ensure there are clear pathways to restrooms, exits, and other essential areas. Get feedback from other stakeholders, such as the event planner or venue coordinator.
Before You Finalize Your Layout
- Double-check all measurements and dimensions.
- Confirm the placement of power outlets and other utilities.
- Ensure compliance with fire safety regulations, including clear exit paths.
- Consider the needs of guests with disabilities, such as wheelchair accessibility.
Optimizing Traffic Flow in Your 40x100 Tent
Smooth traffic flow is essential for a comfortable and enjoyable event. Bottlenecks and congested areas can lead to frustration and detract from the overall experience. Here are some tips for optimizing traffic flow in your 40x100 tent layout:
- Create Wide Walkways: Ensure walkways are at least 4-5 feet wide, especially in high-traffic areas.
- Strategic Placement of Key Areas: Position the bar, buffet, and dance floor in locations that minimize congestion. Avoid placing these areas directly in the main pathways.
- Clear Signage: Use clear and visible signage to direct guests to restrooms, exits, and other important areas.
- Consider Guest Arrival and Departure: Plan for the flow of guests as they enter and exit the tent. Ensure there is ample space for greetings and departures without obstructing other areas.
By carefully considering these factors, you can create a layout that encourages smooth movement and minimizes congestion, ensuring a positive experience for all your guests. Use your table arrangement tool to simulate guest movement and identify potential bottlenecks.
Lighting and Décor Considerations for Your Tent
Lighting and décor play a crucial role in transforming a 40x100 tent from a blank canvas into a stunning event space. The right lighting can create ambiance, highlight key features, and enhance the overall atmosphere. Décor elements like linens, centerpieces, and draping can add personality and style to your event.
Consider the following lighting and décor tips:
- Layered Lighting: Use a combination of ambient, task, and accent lighting to create depth and visual interest.
- Uplighting: Use uplighting to highlight the tent's structure and create a dramatic effect.
- String Lights: String lights add a touch of whimsy and romance, perfect for weddings and outdoor events.
- Table Centerpieces: Choose centerpieces that complement the overall theme and décor of your event.
- Draping: Use fabric draping to soften the tent's interior and create a more elegant and intimate atmosphere.
Remember to coordinate your lighting and décor with your overall event theme and color scheme. A cohesive design will create a polished and memorable experience for your guests.
40x100 Tent Layout Examples and Templates
To inspire your own 40x100 tent layout, here are a couple of examples showcasing different seating arrangements and design choices:
Example 1: Wedding Reception
- Round tables for guest seating, promoting conversation.
- Central dance floor with a stage for the band or DJ.
- Head table positioned prominently, with clear sightlines.
- Soft, romantic lighting with string lights and uplighting.
Example 2: Corporate Event
- Rectangular tables arranged in rows, maximizing space for presentations.
- A large stage with a projector screen for presentations.
- A dedicated area for networking and refreshments.
- Bright, professional lighting to enhance visibility.
These examples highlight how different layouts can be tailored to suit the specific needs of different events. Use these as starting points and adapt them to your own unique vision.
You can also find free seating chart templates online to help you get started. These templates provide pre-designed layouts that you can customize to fit your tent size and guest count. You can easily adapt a seating plan template within SeatingChartCreator.com and adjust to fit your needs!
Mistakes to Avoid When Planning Your Tent Layout
Even with careful planning, it's easy to make mistakes when designing your 40x100 tent layout. Here are some common pitfalls to avoid:
- Overcrowding the Tent: Don't try to squeeze in too many tables. Prioritize guest comfort and ensure adequate spacing.
- Ignoring Guest Needs: Consider the needs of guests with disabilities, elderly guests, or families with young children.
- Poor Placement of Restrooms: Ensure restrooms are easily accessible and conveniently located.
- Neglecting Power and Utilities: Plan for adequate power supply for lighting, sound systems, and other equipment.
Expert Tips for a Flawless Tent Event
Here are some additional expert tips to help you create a flawless event under your 40x100 tent:
- Hire a Professional Event Planner: An experienced event planner can provide valuable guidance and expertise.
- Conduct a Site Visit: Visit the tent location in advance to assess the space and identify any potential challenges.
- Create a Backup Plan: Have a contingency plan in case of inclement weather or other unforeseen circumstances.
- Communicate with Your Vendors: Keep your vendors informed of your layout and any specific requirements they need to be aware of.
By following these tips, you can create a memorable and enjoyable event for all your guests. Remember, a well-planned table arrangement and thoughtful design can make all the difference.
Frequently Asked Questions
The number of tables you can fit in a 40x100 tent depends on the size and shape of the tables, as well as the desired spacing between them. As a general guideline, you can comfortably fit between 40-50 round tables (60-inch) or 50-60 rectangular tables (6-foot) while maintaining adequate spacing. It's always best to use a seating chart creator to visualize your layout and ensure a comfortable fit.
Get Event Planning Tips
Weekly tips on seating arrangements, event layouts, and planning strategies.
SeatingChart Team
Our team of event planning experts is dedicated to helping you create unforgettable events with perfect seating arrangements.
Ready to Create Your Seating Chart?
Start planning your perfect event layout with our free drag-and-drop seating chart creator. No sign-up required to try it out!
Try Free Seating Chart Creator